How to Draw a Fancy Flower Step by Step
Perhaps you want to create your own flower crown drawing for wedding stationery, wall art, a birthday card, or another creative project? This post will give you a step-by-step process that you can understand and follow to complete your flower crown drawing.
[Related Article: Let's Explore Steampunk Art!]
Flower crowns are a gorgeous form of headwear made by selecting delicate flowers like roses, lavender, and violets woven together in an elegant design around the top of the wearer's hair.
They are usually made out of fresh or dried flowers and leaves that can be found in your garden, picked up at craft stores (like Hobby Lobby), or on Etsy. Flower crowns are often associated with festivals like Mardi Gras and other celebrations. They can also be used for weddings and other spiritual ceremonies, like Henna parties or Baby naming ceremonies.
Flower crowns can be used for all sorts of things! Flower crowns are most often worn at festivals, celebrations (like Mardi Gras), wedding galas, birthdays, holidays – just about any event you can think of! You can also wear a flower crown as an accessory or hang it on your wall.
Specific Kinds of Flowers to Include in a Flower Crown
Let's talk about the specific kinds of flowers you'll want to include when making your own flower crown: roses and other red/pink flowers, orange flowers (like carnations or chamomile), yellow flowers (such as sunflowers and daffodils), purple flowers (for example, lavender or lilacs). Flower crowns can include any flower you want!
Draw your Own Flower Crown
To draw your own flower crown, all you'll need is a pencil, a permanent ink pen, and paper. You can also add a watercolor wash to your finished drawing for more of an impact! Flower crown drawings are great for card making, art journal pages, and wall art. For this tutorial, I'll be using a rose flower crown. But you can use any flowers that are on hand!
*Disclaimer: Originally, I did this flower crown sketch in pencil, and then when I realized that you could hardly see the pencil sketching in my photos, I decided it would be better to go over the pencil with pen. While most people prefer to use pen and ink for a realistic flower crown in their drawings, if you would instead work solely with pencils, then you can still follow my step-by-step guide to make your drawing come out just as realistically. You should make sure to add some grading to your pencil shading. A good idea is to practice your shading techniques on a scrap piece of paper before you begin!
Reference Material for a Flower Crown Drawing
Whenever you paint a plant or flower, it is essential to use a good reference image.
Work from your imagination
The truth is that most people are not able to draw from their memories when drawing flowers but can instead only recreate the memory as accurately as possible. They may leave out important information about the original flower, resulting in a stylized or simplified method of recreating it than what it originally was.
If you want to draw a flower or plant in a more abstract or expressionistic manner, then it is absolutely fine to work with a more stylized, simplified drawing. In this case, drawing from your imagination would work well.
Work from your own photos
Drawing from your own photos is a great way to come up with unique ideas and compositions. You also have first-hand experience of what the flower crown of roses in the flower crown look like in a real-life situation. This gives you a better idea of how the subject matter "sits in space" so to speak.
Work from a free stock photo
Because I wanted a level of naturalism in my artwork, I chose to work from a photograph of roses that I found onunsplash.com.
If you cannot get your own photographs of your chosen subject matter, then you can always use free images from unsplash.com orpexel.com. There are a huge variety of free stock photo sites on the web, but these two are the ones I have used the most for good reference photos.
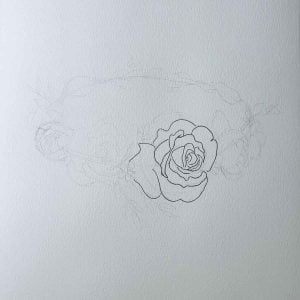
Step 1 – Map out the shapes.

Do a pencil sketch of the basic shapes of the flower crown. You will see I have drawn out the oval ring of the flower crown, and then added circles where I will be placing the roses.
It is essential to start drawing by using gentle pressure and sketching the shape. Because you have drawn it softly and lightly in pencil, it is easy to rub it out when we get to the pen drawing.
Step 2 – Center of the rose.

Start your actual rose drawing in the middle of each flower. This way, you will be able to place the petals of the rose and the other roses more accurately.
Step 3 – Petals.
Sketch your petals around the center bud.
Step 4 – Second Rose.

Using the process above, draw in your second rose.
Step 5 – 3rd and 4th Roses.

Draw in the shapes of your petals for your third and fourth roses on your flower crown.
Step 6 – Leaves and Vines.

Begin to draw in the leaves and vines that connect the flower crown.
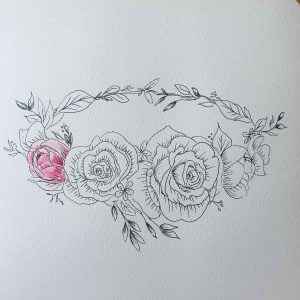
Step 7 – Complete the circle.

Add more leaves and vines to the circle shape of the flower crown in order to finish off the outline.
Step 8 – Shading

Using simple hatching, add shadows and depth to your roses, vines, and leaves in your flower crown drawing.
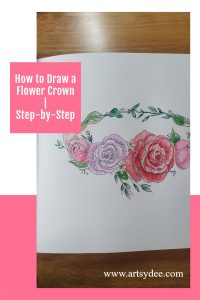
Step 9 – Paint a Watercolor Flower Crown
Turn your flower crown drawing into a watercolor flower crown!
When you first start painting with watercolors, you'll use a method known as wet-on-dry. Basically, you're putting paint on your paintbrush and then painting right onto the page's dry surface. This is a fantastic place to start because you have more control over the colors you use.
After you've defined your forms with your initial color, you can use a method called wet-on-wet to wash them in.
Wet-on-wet painting is when you use watercolor paint to paint on a wet surface. The color then blooms and bleeds, resulting in intriguing color washes.
Although less controllable than wet-on-dry, I enjoy seeing the watercolor pigment dry and produce beautiful textures and patterns.
I started by painting this watercolor flower crown using a wash of Rose Madder over the petals of the rose on the left.
Step 10 – Small Rose on Right

Use Rose Madder watercolor again to paint in the rose on the right-hand side of the flower crown.
It is important to note that you can develop your shadows on the rose petals, leaves, and vines by layering your watercolor on the flower crown.
Step 11 – Purple Rose on Left

To paint the purple flower on the left, mix Dioxazine Violet and Purple Lake to make a purplish-pink color.
Step 12 – Red Rose and Greenery. Completed Watercolor Flower Crown.

Use washes of Alizarin Crimson to build up the red rose. For the greenery, use Hookers Green and Sap green to color the leaves and vines.
Flower Crown Drawing Supplies
2B Pencil
Permanent Ink Pen
Eraser
Scrap piece of paper for testing colors, and pen and ink mark making
300gsm Watercolor Paper: If you want to add a wash to your drawing, you should definitely do your drawing on good-quality, heavy paper that doesn't buckle.
Soft Bristle Round or Filbert Brush
Watercolor pans or tubes. I am currently using theWindsor and Newton Watercolor Pan. The colors are rich, and the tray itself is portable and easy to use.
How to Use your Flower Crown Drawing
You can use your flower crown drawing as wall art, card making, for art journal pages, photo albums, junk journaling, and more!
I decided to have a bit of fun with my flower crown drawing, and I edited it onto some cute photos of animals for my daughter's bedroom! I also used some other flower crown designs I found, like a daisy flower crown and a rose flower crown.
Free Flower Crowns Animal Printables – PDF Download
"Flower crown drawings are a great way to show your love of nature. It is often used as a symbol of beauty or joy."
If you would like these free flower crown animal printables for your own wall art, card making, or creative project, just sign up for my newsletter below!
These printable flower crown animals come in a pdf format for easy printing – all you do is turn on your printer, select the size you want, and print!
These are the animals included in the free flower crown animal printables:
Llama with a flower crown, Bunny with a flower crown. and "Flower Cow" – Cows with flower crowns.
"Flower Cow" – Cows with Flower Crowns
Bunny with a Flower Crown
(More bunnies with flower crowns) & a Llama with a Flower Crown

More Drawing Tutorials…
If you enjoyed this drawing tutorial, take a look at these tutorials below:
~ How to Draw a Sunflower
~ How to Draw a Hibuscus Flower
~ How to Draw a Daisy Flower
Conclusion
How to Draw a Drawing a flower crown is a fun and satisfying art project for beginners and more advanced artists. Hopefully, my advice on pen and ink, and watercolor wash techniques, and which materials to use will help you start your own flower crown drawing! Before you go, tell me your creative flower crown project.
How to Draw a Fancy Flower Step by Step
Source: https://artsydee.com/flower-crown-drawing/
0 Response to "How to Draw a Fancy Flower Step by Step"
Enregistrer un commentaire